Unlock Better Baking: Easy DIY Brown Sugar with Just 2 Ingredients
Imagine this: You're halfway through mixing up a batch of your favorite chocolate chip cookies, the butter and sugar are perfectly creamed, and then it hits you – you're completely out of brown sugar. The horror! A sudden trip to the grocery store feels like an eternity, disrupting your baking flow and testing your patience. But what if you never had to face that dilemma again? What if you could whip up fresh, flavorful brown sugar right in your own kitchen, in mere minutes, using ingredients you likely already have?
The good news is, you absolutely can! Learning
how to make brown sugar at home is not just a clever kitchen hack; it's a game-changer that promises superior flavor, a consistently soft texture, and ultimate convenience. Forget hard, clumpy bricks of store-bought sugar; your homemade version will always be fresh, moist, and ready to elevate your baked goods and savory dishes alike. Get ready to transform two simple pantry staples into a baking essential, unlocking a new level of culinary confidence.
The Sweet Truth: Unpacking What Brown Sugar Really Is
Before we dive into the "how," let's demystify what brown sugar actually is. At its core, brown sugar is simply white granulated sugar blended with molasses. It’s that rich, dark syrup derived from refining sugarcane or sugar beets that gives brown sugar its characteristic color, deep flavor, and moist texture.
The key distinction between light and dark brown sugar lies in the amount of molasses added:
*
Light Brown Sugar: Contains a smaller proportion of molasses, typically around 3.5% by weight. This gives it a milder caramel flavor and a lighter color, making it ideal for delicate baked goods like shortbread, glazes, and many cookie recipes where you want a subtle sweetness.
*
Dark Brown Sugar: Boasts a higher molasses content, usually around 6.5% by weight. This results in a deeper, more robust flavor profile, often described as having notes of toffee or even a slight bitterness. Its intense richness makes it perfect for gingerbread, barbecue sauces, baked beans, and recipes where a strong molasses flavor is desired.
The magic of homemade brown sugar, compared to its store-bought counterpart, is its freshness and lack of additives. Commercial brown sugar is often processed, dried, and treated to prevent clumping and extend shelf life. This can strip away some of its natural moisture and nuanced flavor. When you make it yourself, you skip all those steps, resulting in a naturally softer, more aromatic product that brings a noticeable difference to your cooking and baking.
Your Pantry Power-Up: Ingredients and Essential Tools
The beauty of this DIY project lies in its simplicity. You only need two core ingredients, plus a couple of common kitchen tools.
The Dynamic Duo: Ingredients
1.
Granulated White Sugar: Any standard granulated white sugar will work perfectly. Whether it's cane sugar or beet sugar, fine or regular grain, it serves as the base for our brown sugar.
2.
Molasses: This is the crucial flavor and moisture component. For the best results and authentic flavor, we highly recommend using
unsulfured molasses. Sulfured molasses (often labeled "cooking molasses") contains sulfur dioxide as a preservative, which can impart a slightly bitter or off-flavor. Unsulfured molasses, on the other hand, offers a cleaner, sweeter, and richer taste profile.
*
A Note on Blackstrap Molasses: While it is a type of molasses, blackstrap is a byproduct of the third boiling of sugar syrup, making it very dark, thick, and intensely bitter. Unless you're specifically aiming for a very strong, almost medicinal flavor, it's generally best to avoid blackstrap for making everyday brown sugar.
*
Can I use honey or maple syrup? While they are sweeteners, honey and maple syrup have different chemical compositions and flavor profiles than molasses. Substituting them will result in a product that tastes and behaves differently, not true brown sugar. Stick with molasses for authentic results.
Essential Tools
*
Food Processor (Recommended for Best Texture): This is truly the easiest and most efficient method. A food processor thoroughly blends the sugar and molasses, creating a wonderfully uniform and soft texture that mimics store-bought brown sugar perfectly.
*
Large Mixing Bowl and Fork/Spatula (No Equipment Method): If you don't have a food processor, or just need a small batch quickly, a sturdy bowl and fork will get the job done. It requires a bit more elbow grease, but is entirely feasible.
*
Measuring Cups and Spoons: Accuracy in ratios is key for perfect light or dark brown sugar.
Mastering the Mix: A Step-by-Step Guide to Making Brown Sugar
Now for the fun part: turning those two humble ingredients into baking gold! The process is incredibly fast, often taking less than five minutes from start to finish.
The Golden Ratios for Perfect Brown Sugar
These precise ratios will ensure you achieve the desired flavor and consistency every time:
*
For Light Brown Sugar:
* 1 cup (200g) granulated white sugar
* 1 tablespoon (15ml) unsulfured molasses
*
For Dark Brown Sugar:
* 1 cup (200g) granulated white sugar
* 2 tablespoons (30ml) unsulfured molasses
Pro Tip: While these are standard, don't be afraid to slightly adjust the molasses content to your personal taste once you've made a batch or two. If you like a slightly richer light brown sugar, add a scant extra half-teaspoon of molasses.
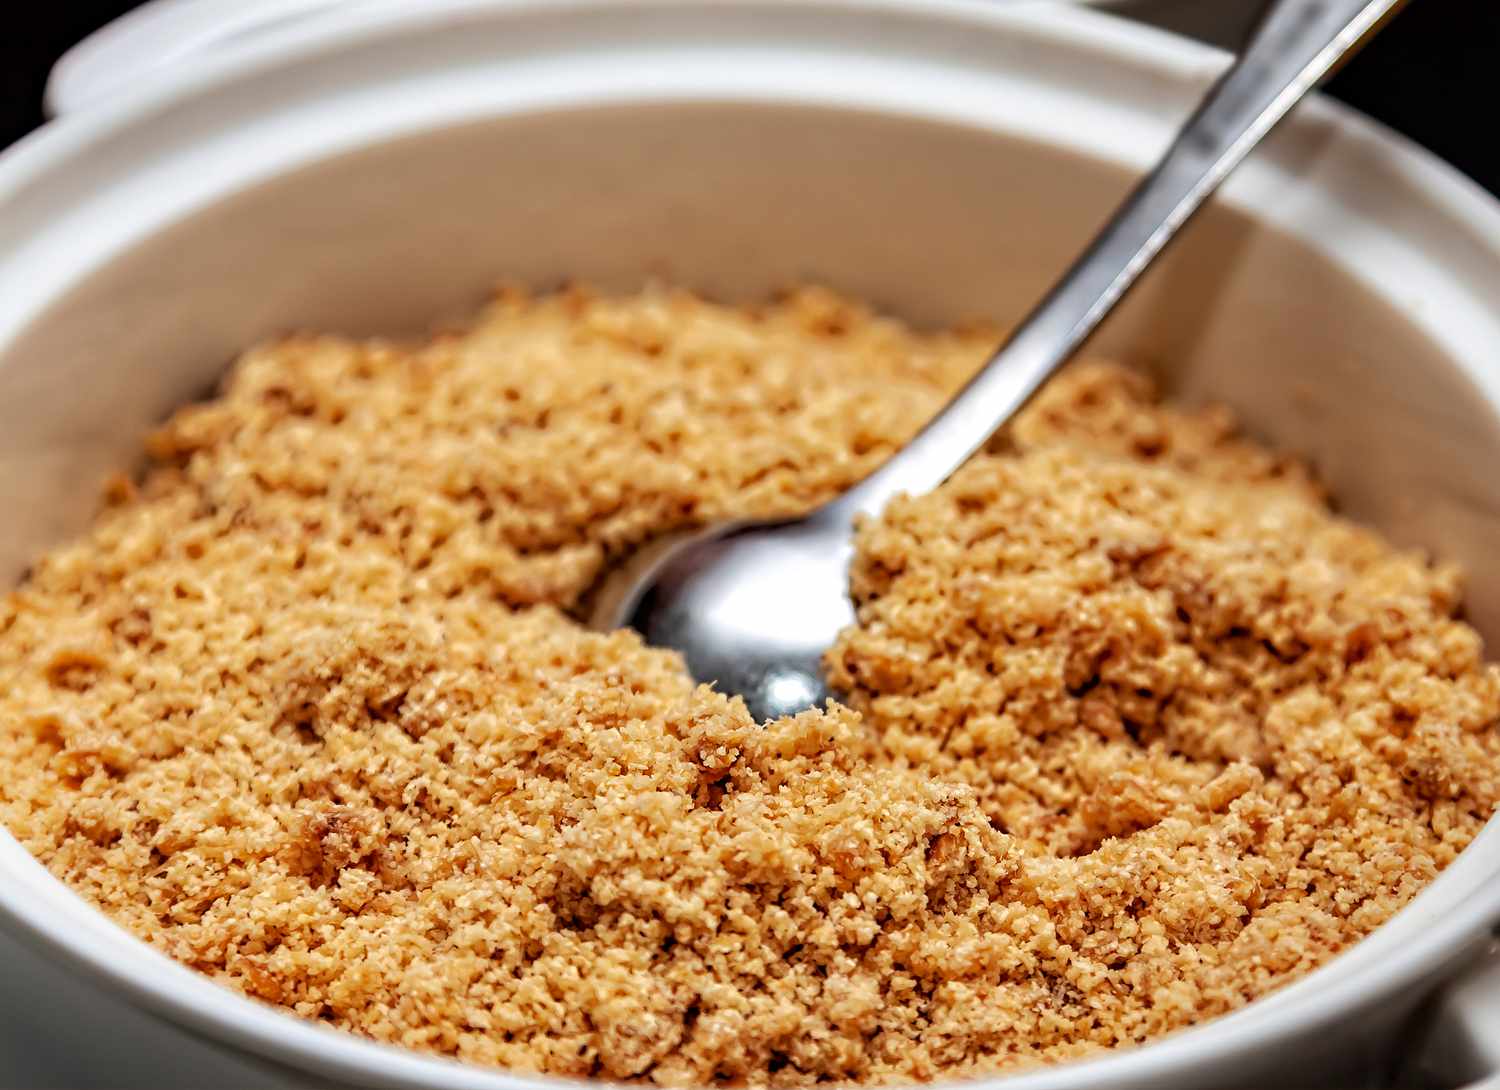
Method 1: The Food Processor Approach (Best Texture)
This method is quick, creates a beautifully uniform product, and is highly recommended for achieving that classic, soft brown sugar texture.
1.
Combine Ingredients: Add your measured white granulated sugar and the appropriate amount of molasses directly into the bowl of your food processor.
2.
Blend Away: Secure the lid and pulse the mixture for about 30-60 seconds. You'll want to watch it carefully. Initially, it might look like wet sand, but as it processes, the molasses will fully integrate into the sugar crystals, changing the color and creating a moist, uniform texture.
3.
Scrape and Re-Process (if needed): If you notice any unmixed streaks of molasses or dry sugar sticking to the sides, stop the processor, scrape down the sides with a spatula, and give it another quick pulse for 10-15 seconds until everything is evenly combined.
4.
Check Consistency: The finished product should be uniformly colored, moist, and slightly crumbly, similar to the texture of fresh brown sugar straight out of a new bag.
Method 2: The Bowl & Fork Method (No Equipment Needed)
Don't have a food processor, or just need a small amount? This manual method is a perfectly viable alternative, though it requires a bit more effort.
1.
Combine Ingredients: Place your measured white sugar and molasses into a sturdy mixing bowl.
2.
Mash and Mix: Using the back of a fork or a sturdy spatula, begin mashing and stirring the molasses into the sugar. It might seem resistant at first, forming sticky clumps. Keep at it! The goal is to break up any large clumps and evenly distribute the molasses.
3.
Break Up Clumps: Continue mashing and stirring, using the back of the fork to press the mixture against the side of the bowl, until all the sugar crystals are coated and the color is uniform. This process might take 3-5 minutes of consistent effort.
4.
Final Check: The mixture should feel moist and slightly sticky, but not wet. Any small clumps can easily be broken apart with your fingers or the fork.
If you're eager to try this quick method right away, our guide
Never Run Out: Make Homemade Brown Sugar in 5 Minutes offers even more tips to get you started. For a deeper dive into the precise ratios and an extensive storage guide, check out our article on
Homemade Brown Sugar: Light vs. Dark, Ratios & Storage Guide.
Storing Your Sweet Gold & Troubleshooting Common Hiccups
One of the great advantages of homemade brown sugar is its natural moisture. However, proper storage is key to maintaining that softness, and a few common questions often arise.
Storing Your Homemade Brown Sugar
*
Airtight is Key: Always store your brown sugar in an airtight container at room temperature. This prevents moisture loss, which is what causes brown sugar to harden. Options include plastic containers with tight-fitting lids, glass jars with rubber seals, or even heavy-duty zip-top bags with all the air pressed out.
*
Room Temperature: There's no need to refrigerate brown sugar. In fact, cold temperatures can make it harden faster.
*
Shelf Life: Stored correctly, your homemade brown sugar will stay fresh and soft for several months – often as long as or even longer than store-bought varieties, thanks to the natural preservatives in molasses.
Troubleshooting: When Your Sugar Hardens or Clumps
*
My Brown Sugar Hardened! How Do I Soften It? If, despite your best efforts, your brown sugar does dry out and harden (it happens!), don't despair! Simply add a few drops of fresh molasses to the container, seal it, and let it sit overnight. The sugar will reabsorb the moisture and soften right up. You can also try placing a slice of fresh bread, an apple wedge, or a terracotta brown sugar saver in the container for a day or two.
*
Why is My Homemade Brown Sugar a Bit Clumpy? This is entirely normal, and actually a sign of how fresh and moist your homemade sugar is! Commercial brown sugars are often treated to prevent this natural clumping. Simply break up any clumps with a fork or your fingers before measuring. If you need a perfectly smooth measure for a recipe, you can lightly pack it into your measuring cup as usual.
Beyond the Basics: Unleashing Your Homemade Brown Sugar in the Kitchen
Now that you've mastered
how to make brown sugar, it's time to put your sweet creation to good use! Homemade brown sugar is a 1:1 replacement for store-bought brown sugar in virtually any recipe. Its superior freshness and flavor will genuinely elevate your culinary creations.
Consider these applications where homemade brown sugar truly shines:
*
Cookies and Quick Breads: The extra moisture from the molasses contributes to incredibly soft, chewy cookies (like chocolate chip cookies!) and tender, moist quick breads such as banana bread, pumpkin muffins, and zucchini loafs.
*
Sauces and Marinades: Dark brown sugar, in particular, adds a complex, sweet, and savory depth to barbecue sauces, teriyaki marinades, and glazes for ham or poultry. Its molasses notes perfectly complement savory spices.
*
Breakfast Treats: Sprinkle it over oatmeal, stir it into coffee, or use it to sweeten homemade granola.
*
Desserts: From crumbles and crisps to rich brownies and sticky toffee pudding, the nuanced flavor of homemade brown sugar enhances a wide array of sweet treats.
*
Beverages: A touch of dark brown sugar can add a wonderful depth to mulled cider, hot buttered rum, or even certain cocktails.
The benefits of making your own are truly compelling: always soft and fresh, richer and more complex flavor, complete control over ingredients (no preservatives or additives!), and the immense satisfaction of a simple, effective DIY.
Conclusion
Learning
how to make brown sugar is one of those wonderfully simple kitchen skills that delivers outsized rewards. It eliminates last-minute grocery runs, saves you money in the long run, and most importantly, enhances the flavor and texture of everything you bake and cook. With just white sugar and molasses, a few minutes of your time, and optionally, a food processor, you can create a superior product that will change your baking game forever. So, go ahead – embrace this easy hack and never look back. Your taste buds (and your baking schedule) will thank you!